New Year Return!

Tuesday 5 January 2016


Happy New year everyone! We're officially back, from a well needed break. I'm currently catching up on a good 200 messages so bear with me, you should hear off me this week if you got in touch during the Christmas period. I'm also working through a good 100 orders, so dispatch emails should be making their way over this week also. 

Christmas was amazing (I made my FIRST Christmas dinner for the both of us, yup!), shared lots of presents and even got in a bit of game time on the PlayStation. This year, I totally went all out and cooked a vegetarian roast for me (with mushroom wellington in a brandy sauce) and bacon wrapped poussin for Eloise. I wish I took some beautiful shareworthy photos but apart from a quick snap on the phone, we wolfed it down!

Now, it's time to get motivated and started on those resolutions. This year, my goals are all about health and spending quality time with loved ones. Making memories - because it's important not to let life pass you by, right?

So, what are your New Years resolutions? Do you have any personal ones set or any business related goals?

Let us know in the comments below! 


Halloween: Our Top Pumpkin Picks!

Sunday 18 October 2015

Autumn is well under way, and it's that time of year for pumpkins!

This year we're going to share the most unusual pumpkin decorating ideas, including several 'no carve' options. 


Way back as a student on halls of residence, we carved up a Voldemort, Pikachu and Princess Peach pumpkin. There are so many templates online to have a go at, and it's so much fun! Just search 'pumpkin carving templates,' pick up a carving kit from your local supermarket and GO!


This year however, we're keen on the no-carve pumpkin trend! It's time to step up your pumpkin game...

Who says Halloween can't be pretty?!

1. This DIY tissue paper pumpkin (found here)


4. Did someone say OMBRE pumpkins? (Click here)


Will you be pumpkin decorating this year?!

Viva La Hama!

Saturday 3 October 2015


'Fess up, who remembers playing with Perler beads as a child? I probably have a photo of myself tucked away in the attic, pegboard carefully balanced on knee and the look of utmost concentration on my face - as if placing each colour in the exact right spot were a life or death situation. 

This month I decided to get playful, combining modern geometric pattern, colour and design with the childhood nostalgia of Perler beads.

If you follow me on Instagram, you may have already seen my patchwork of Perler hexagon coasters.


The clashing patterns and colours makes my heart race. Eek!

I will be adding up custom sets on Etsy veeeeery soon (because these are SURE to brighten up your house on a rainy day and get your visitors talking!).

If you want to rediscover this childhood classic and have a go at some designs yourself, you can get a whole range of colours from Amazon. Even ones you couldn't imagine getting in the 90s, like neon pink! 

Show us your creations in the comments or tag us on social media with #vivalahama! 

A Short Trip to Newquay, Cornwall

Sunday 9 August 2015

It's almost Monday, so I decided there would be no better time than to settle down and write.


In June, the two of us set off to Cornwall for four days for a little break away. We saw a Groupon for a three night hotel stay and impulsively decided to snap it up. In hindsight, it would have been better planned, but I don't regret it. It was sunny on three of the four days, and the trip proved that you don't need to travel far or go somewhere exotic to enjoy new surroundings and find picturesque spots. There are some beautiful places in England too, and Cornwall is one of them.


First off, I'm not a fan of being negative, but the hotel itself wasn't a great decision. We paid for a seaview room and it was completely overpriced for what it was - the room was small, stuffy and outdated, and the interior of the hotel itself was massively in need of an update. When we arrived, the door was locked (even though it was only 7.00pm) and when we were eventually let in, the foyer smelt badly of smoke and we were met by a drunk and abrasive woman. If I had actually read the reviews beforehand I would have seen similar experiences by others, but what's life without a little risk sometimes? I'm not going to name where we stayed but although it was disappointing, it was in a great location by Porth beach.


I spent waaaay more time relaxing than I did anything else - the first night we went on a short walk, on day two we went and explored the area, day three was spent on the beach getting some vitamin sea and on the last day, we had a six hour travel back so weren't really able to do much. 


We REALLY wanted to visit the Eden project because we've never been before and it's somewhere both of us have always wanted to visit, but we didn't really have enough time (and we were too exhausted!). I'm not disappointed we didn't manage to get there because it was still super nice just to have a few days somewhere different and get a little space, but it's still firmly on my to visit list! 


Oh, and is it just me, or are those rocks reminiscent of the Loch Monster?! 

This May we're crushing on...

Thursday 14 May 2015


This week I decided to make a board on Pinterest for one of this summer's hottest trends we're loving, flamingos and pineapples!

Here are some of my favourite picks:

1. This DIY Pineapple night light from ABM - SWOOOOOOON! (Find it here)


2. These cute flamingo fairy lights! (Find them at: http://www.suicidalshop.fr/)


3. This WEDDING pineapple! (Yep!)


4. This photo of a suuuuuper bendy flamingo!


5. This pineapple inspired ensemble! (http://www.studiodiy.com/page/3/)


6. This flamingo swim dress!


You can view the rest of the board here: https://www.pinterest.com/auberginefox/may-crush-flamingos-and-pineapples/

We'll have some pineapple and flamingo themed pieces hitting the store soon!


Quick 15 Minute Felt Banner

Wednesday 13 May 2015

...I'm baaaaaack!

This week instead of posting something boring like an update, I thought I'd share a quick and easy DIY banner. These are perfect for brightening up your little one's room, for parties or just to have around the house!

I went for more typical unisex colours, which kind of reminds me a little of a superhero theme!


+ + + + + + + + + + 


SO, WHAT DO YOU NEED?!

Literally all you need to make a DIY banner is:

- Twine
- Felt (available from most craft stores)
- Glitter felt (optional - but you can get some from Josy Rose online)
- A little Pritt Stick and some Superglue (preferably Loctite)
- Some washi tape for hanging
- Scissors

1. Cut out your felt overlay:
This is the grey part, that is most of the banner you can see! It's easiest to do this first because then you can stick it to your mounted back. I didn't draw it out first, I just let go with the scissors and cut! I did this deliberately because I wanted it to have a real handmade, authentic feel and if I drew it out, I knew I would end up measuring and making sure it was even; that really wasn't the look I was after.

2. Cut out the base backing: 
For ours, I used some metallic kaleidoscope glitter fabric. To attach it to the back, I didn't want to use stitching but this is completely down to what you prefer, I first used pritt stick (a craft classic!). Then once I stuck it to the base, to make it extra secure, I used a little super glue on the edges.

NOTE: DO NOT GLUE DOWN THE TOP TWO CORNERS WHERE YOU WILL BE PLACING HOLES FOR YOUR HANGING. IF USING SUPER GLUE, BE EXTRA CAREFUL. YOU ONLY NEED A LITTLE (SO IT DOESN'T ABSORB THROUGH THE FELT); SUPERGLUE AND FELT CREATES AN EXOTHERMIC REACTION SO IT CAN GET HOT.

I'm sure this is a given, but if you're making banners with your tiny humans, make sure this part is done by a grown up! 

3. Cut out your letters and attach:
I cut mine freehand but if you're not comfortable with that, it's easier enough to draw out a template to cut around. When sticking I found I didn't need any super glue for this part, you can just use your own judgement as to whether you feel it needs to be extra secure.

4. Make the holes in the top two corners:
This is the hardest part! To do your holes, you can try using a punch, but the ones I had weren't strong enough so I had to do it by hand using scissors. As it's hard to get a clean cut, for this part I cheated, just to make sure it didn't look too messy - I cut out a couple of little grey triangles to cover the holes on the front and on the back, made some cute little grey hearts.

5. Cut a length of twine/ribbon and tie through the holes:
This bit is fairly self explanatory. Once you've done this, if you're going to add little patches, add them now! I just used superglue for mine, to make sure they don't come off as the twine moves when putting up or taking down.

6. Finally - fix down the corners!


Extra notes - if your banner is a little weighty, you can use a heavier twine or simply adjust the length until it sits how you like.


To put up, just add a little washi tape and voila!

Have fun getting crafty, and see ya next time!

Spring Garlands We're Lusting After!

Thursday 9 April 2015

Happy Thursday! This week we decided to post our favourite round up of garlands and bunting - the sunny weather has definitely made us in the mood to inject some colour at the Aubergine Fox Den!

We heart this Fiesta Garland by TouchOMagic on Etsy! Buy it here

You may have seen earlier our newest tassel garland made for us by Tassels and Tails on Etsy, something I've been dreaming of making for some time now but with so much work on at the minute, just never seemed to have the time. We were absolutely thrilled with it, she made it up to the exact specifications we had and it arrived super speedily! (If you haven't seen it yet, head to our Facebook page or Twitter for a little preview).

They're really easy to make and there are a lot of tutorials online (we particularly recommend this tutorial on youtube: https://www.youtube.com/watch?v=gpN2fgEH1Xg). They're also bright, fun and if you're strapped for cash, affordable to do at home yourself.

If my den were bigger (by bigger, I mean anything larger than a small one bedroom flat!), I'm pretty sure I would have a hard time stopping myself from stocking up on a huge selection of garlands. I have a respectable six or seven different ones (not out at the same time!), and constantly drool over others I want to add to the collection!

So, to relieve some of my garland fever and give myself an excuse to peruse the web, I'm going to share some of my favourites with you.

1. This scalloped gold garland from Steph Loves Ben (from £8.33). 


Scallop edges have been making a huge revival over the past few years and we still can't get enough. Combine that with glitter and our all time favourite metallic, gold, and you have a winner.

2. This rainbow felted heart garland from Azalea Cottage Crafts


My all time favourite things - garlands, felt and rainbows, what's more to love?!

3. Felt Ivory Flower Garland from Such a Squirrel


This gorgeous garland is perfectly designed for weddings, but this wouldn't stop me from adorning my home with it during the spring/summer months! It would be especially ideal for adding a few decorations outside during the warmer season for a little gathering or BBQ. Simple yet sophisticated, this garland works well in both formal and more casual settings.


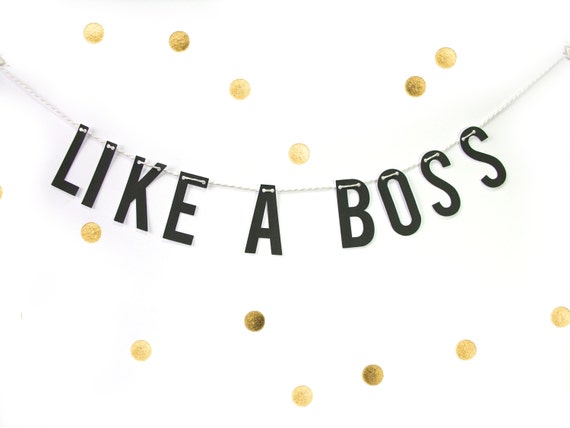
4. Word Banners: Like a Boss Banner from All Her Glory


Technically a banner not a garland, but these word banners are so on trend right now and for a very good reason. This banner would be the perfect motivation for a studio or office space, especially for all those #girlbosses out there!


I'm going to step away from the computer now to grab a snack and get a little fresh air, so I'll see you all again soon!